언어: Java 17
라이브러리: Zxing
공통
1. 사용하는 빌드 관리도구에 맞게 라이브러리 추가
https://mvnrepository.com/artifact/com.google.zxing/core
https://mvnrepository.com/artifact/com.google.zxing/javase
2. QR을 앞단에서 출력하기 위해서는 바이트로 받아야 이미지로 출력할 수 있기 때문에
컨트롤러단에서 Return Type을 아래와 같이 설정해야한다.
ResponseEntity<byte[]>
시나리오 1: 앞단에서 이미 QR 이미지로 인코딩 할 데이터가 있는 경우 (예: url)
시나리오 1-1: 테스트를 위해 QR 이미지로 출력 가능한 데이터는
이미 자바단에서 하드코딩이 되어있고
String url = "https://samori.tistory.com/";
앞단에서는 앵커 태그만 존재하는 경우겠다.
HTML
<div>
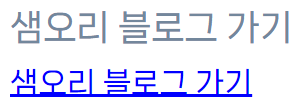
<h3>샘오리 블로그 가기</h3>
<a href="/qr/samOriBlog">샘오리 블로그 가기</a>
</div>
Controller
    @GetMapping("/qr/samOriBlog")
    public ResponseEntity<byte[]> qrSamOri() throws WriterException {

        int width = 300;
        int height = 300;
        String url = "https://samori.tistory.com/";

        BitMatrix encode = new MultiFormatWriter()
                .encode(url, BarcodeFormat.QR_CODE, width, height);
        try {
            ByteArrayOutputStream out = new ByteArrayOutputStream();
            MatrixToImageWriter.writeToStream(encode, "PNG", out);
            return ResponseEntity.ok()
                    .contentType(MediaType.IMAGE_PNG)
                    .body(out.toByteArray());

        }catch (Exception e){
            e.printStackTrace();
        }
        return null;
    }
앵커 태그를 클릭 하면 같은 qr코드가 출력 될 것이다.

시나리오 1-2: 테스트라 해도 하드코딩은 오바지..
앞단에서 사용자가 입력한 값으로 qr를 출력하고 싶은 경우
<div>
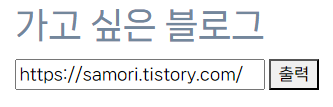
<h3>가고 싶은 블로그</h3>
<form type="POST" action="/qr/blogToVisit">
<input type="text" name="blogUrl">
<button type="submit">출력</button>
</form>
</div>
    @GetMapping("/qr/blogToVisit")
    public ResponseEntity<byte[]> blogToVisit(@RequestParam(value = "blogUrl") String blogUrl) throws WriterException {

        int width = 300;
        int height = 300;
        BitMatrix encode = new MultiFormatWriter()
                .encode(blogUrl, BarcodeFormat.QR_CODE, width, height);
        try {
            ByteArrayOutputStream out = new ByteArrayOutputStream();
            MatrixToImageWriter.writeToStream(encode, "PNG", out);
            return ResponseEntity.ok()
                    .contentType(MediaType.IMAGE_PNG)
                    .body(out.toByteArray());

        }catch (Exception e){
            e.printStackTrace();
        }
        return null;
    }
시나리오 2: 사용자가 입력한 값을 받아서 DB에 조회하고 일치하는 행의 QR 데이터를 읽어와서 이미지로 출력하기
예를 들어 MEMBER 테이블이 있다고 가정해보자.
PK 값은 사번이고
각 사번에 맞게 QR 코드 칼럼에 hexadecimal 코드 데이터가 qrCode라는 칼럼에 존재한다.
1. 사용자는 사번을 입력하고 컨트롤러에 전달한다.
2. 컨트롤러는 전달받은 사번을 db에 비교 조회하여 그 사번에 맞는 행을 가져온다.
3. 가져온 행의 qrCode 칼럼만 추려서 이를 변수화 한다.
4. 변수화 한 데이터를 인코딩하고 인코딩 한 바이트를 앞단에 return하는 원리이다.
앞단에서 파라미터로 전달할 것인지 혹은 url에 담아서 보내든지에 따라 아래처럼 나뉜다.
@RequestParam(value = "전달할 값") String 전달할 값@PathVariable(value = "전달할 값") String 전달할 값
아래 샘플의 경우 간단한 에러 핸들링 로직이 추가된 소스이다.
    public ResponseEntity<byte[]> 함수명(String 파라미터) {
        DTO명 hexCode = 인터페이스명.findByPK칼럼(파라미터);
        // 가져온 행의 qr칼럼만 가져와서 String 변수에 넣어주기
        String hexCodeColumn = hexCode.getQrCode();
        ByteArrayOutputStream outputStream = new ByteArrayOutputStream();
        try {
            generateQRCode(outputStream, hexCodeColumn);
        } catch (WriterException | IOException e) {
            e.printStackTrace();
            return new ResponseEntity<>(HttpStatus.INTERNAL_SERVER_ERROR);
        }

        byte[] qrImage = outputStream.toByteArray();

        HttpHeaders headers = new HttpHeaders();
        headers.setContentType(MediaType.IMAGE_PNG);
        headers.setContentLength(qrImage.length);

        return new ResponseEntity<>(qrImage, headers, HttpStatus.OK);
    }

    private void generateQRCode(ByteArrayOutputStream outputStream, String content) throws WriterException, IOException {
        int width = 너비값;
        int height = 높이값;

        Map<EncodeHintType, Object> hints = new HashMap<>();
        hints.put(EncodeHintType.ERROR_CORRECTION, ErrorCorrectionLevel.H);
        hints.put(EncodeHintType.CHARACTER_SET, "UTF-8");

        QRCodeWriter qrCodeWriter = new QRCodeWriter();
        BitMatrix bitMatrix = qrCodeWriter.encode(content, BarcodeFormat.QR_CODE, width, height, hints);

        MatrixToImageWriter.writeToStream(bitMatrix, "PNG", outputStream);
    }